Imagine the rich aroma of freshly made pasta filling your kitchen, its delicate texture far surpassing anything from a box. For many home cooks, the dream of crafting artisanal pasta at home is often hindered by the perceived complexity or the need for yet another bulky appliance. This is where the pasta maker for KitchenAid mixer truly shines, transforming your versatile stand mixer into a powerhouse for homemade pasta, simplifying the process and bringing the heart of Italian cooking right to your countertop.
The Allure of Homemade Pasta, Simplified
There’s an undeniable charm to homemade pasta. It’s more than just food; it’s an experience, a connection to culinary traditions, and a revelation in taste and texture. Historically, making pasta was a laborious task, requiring strong arms and meticulous hand-cranking. However, for those who already own a KitchenAid stand mixer, stepping into the world of fresh pasta has never been easier or more accessible. These ingenious attachments harness the mixer’s robust motor, taking the physical strain out of rolling and cutting, allowing you to focus purely on the joy of creation.
The Heart of the Machine: KitchenAid Pasta Attachments Explained
KitchenAid offers a range of high-quality attachments designed to integrate seamlessly with your stand mixer, each crafted from durable stainless steel to ensure longevity and consistent performance. These attachments effectively turn your single KitchenAid appliance into a comprehensive pasta-making station.
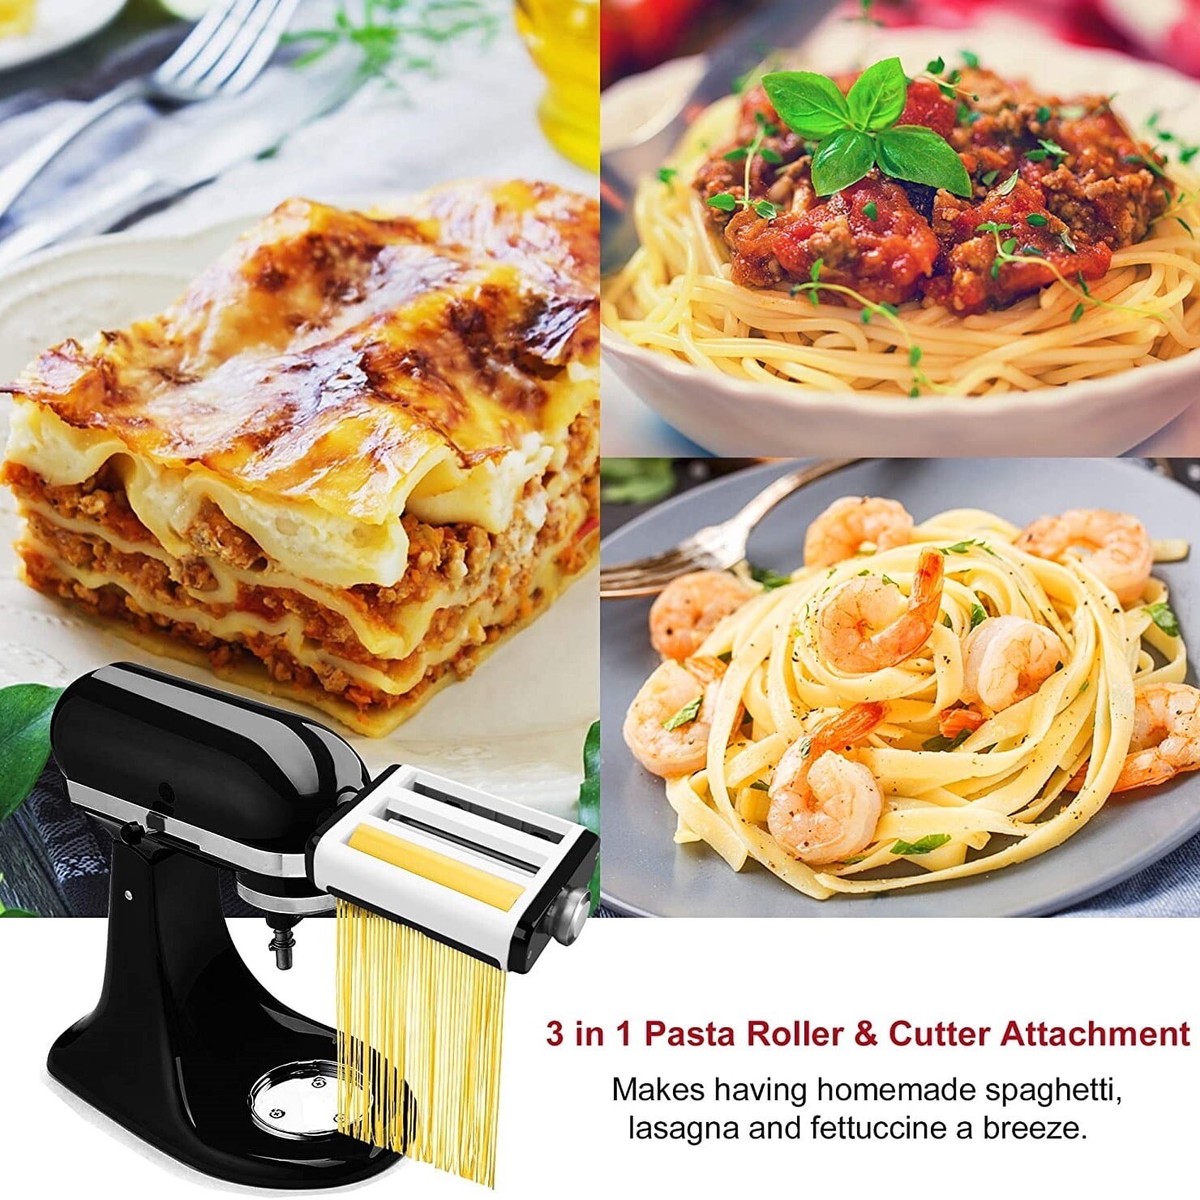
- The Pasta Roller: This is arguably the most fundamental attachment for any aspiring pasta maker. It connects to your KitchenAid’s power hub and systematically flattens your dough into smooth, uniform sheets. With eight different thickness settings, you have precise control, from the thickest setting (ideal for initial kneading and shaping) to the thinniest (perfect for delicate cappellini or paper-thin lasagna). These wide sheets are your canvas for countless pasta varieties, from hand-cut pappardelle to squares for ravioli and tortellini.
- Pasta Cutters (Spaghetti & Fettuccine): Often bundled in a popular 3-piece set with the roller, these cutters effortlessly transform your rolled sheets into classic strands. The spaghetti cutter produces thin, round noodles, while the fettuccine cutter yields broader, flat ribbons. Other specialized cutters, like those for lasagnette (wider ribbons) and capellini (angel hair), are also available for those who wish to expand their repertoire.
- The Gourmet Pasta Press (Extruder): For those who adore tubular or spiral pasta, the Gourmet Pasta Press is a game-changer. Unlike the roller and cutters that sheet and slice, this attachment extrudes dough through various dies, allowing you to create shapes like bucatini, rigatoni, fusilli, and macaroni. It’s an excellent choice for heartier sauces that cling to these unique forms.
Each attachment locks firmly into the mixer’s power hub, providing stability and allowing the mixer’s motor to handle the heavy lifting, freeing your hands to guide the dough with precision.
Why Every KitchenAid Owner Needs a Pasta Maker Attachment
If you already cherish your KitchenAid stand mixer, adding a pasta maker for KitchenAid mixer attachment is not just an upgrade; it’s an awakening for your culinary journey.
- Unleash Your Inner Chef: There’s simply no comparison between fresh, homemade pasta and its dried, store-bought counterpart. The springy chewiness, the vibrant flavor, and the way it absorbs sauce are unparalleled. With a KitchenAid attachment, this gourmet experience is easily attainable.
- Effortless Preparation: Bid farewell to sore arms and awkward hand-cranking. The KitchenAid’s powerful motor does all the hard work of rolling and cutting, leaving both of your hands free to meticulously guide the dough. The stand mixer even handles the initial kneading of your pasta dough with its dough hook, streamlining the entire process.
- Space-Saving Solution: In kitchens where counter space is precious, these attachments are a godsend. Instead of investing in a separate, bulky electric pasta machine, you simply utilize your existing KitchenAid mixer, keeping your kitchen clutter-free.
- Versatility in Your Kitchen: From classic spaghetti and fettuccine to delicate ravioli sheets and hearty bucatini, the range of pasta you can create is truly impressive. These attachments empower you to experiment with different flours, egg-to-flour ratios, and even flavored pastas using herbs or vegetable purees.
- Built to Last: KitchenAid is renowned for its durable, high-quality kitchen appliances, and their pasta attachments are no exception. Constructed from sturdy materials, they are designed to withstand years of regular use, becoming a lasting part of your culinary toolkit.
“The KitchenAid pasta attachment isn’t just another gadget; it’s a gateway to rediscovering the simple joy of authentic, homemade pasta. The consistent results and ease of use truly make it an invaluable tool for any home cook looking to elevate their culinary repertoire.” – Sofia Rossi, Culinary Historian and Pasta Artisan.
Mastering Your KitchenAid Pasta Maker: A Step-by-Step Guide
Getting started with your pasta maker for KitchenAid mixer is simpler than you might think. Follow these steps for consistently delicious results.
Preparing Your Dough
The foundation of great pasta is great dough.
- Basic Pasta Dough Recipe: A classic recipe often involves 2 cups of all-purpose or ’00’ flour, 3 large eggs, a teaspoon of olive oil, and a pinch of salt.
- Using the KitchenAid Dough Hook: Combine ingredients in your KitchenAid mixer bowl and use the dough hook attachment on a low speed until a shaggy ball forms. Knead for 7-10 minutes until the dough is smooth and elastic. This hands-off kneading is a major advantage.
- Resting the Dough: Wrap the dough ball tightly in plastic wrap and let it rest at room temperature for at least 30 minutes (or up to an hour). This allows the gluten to relax, making the dough easier to roll and shape.
Rolling Perfect Pasta Sheets
This is where the KitchenAid pasta roller truly shines, automating a task that can be tedious with manual machines.
- Attach the Roller: Remove the power hub cover on the front of your KitchenAid mixer and firmly insert the pasta roller attachment, securing it with the knob.
- Start at Widest Setting: Set the roller to its widest thickness (usually ‘1’ or ‘2’ depending on the model’s numbering). Turn your mixer to speed ‘2’.
- Feed and Fold: Take a small portion of your rested dough, flatten it slightly with your hands or a rolling pin, and feed it through the widest setting. Once it emerges, fold it in half or in thirds, dust lightly with flour, and feed it through again. Repeat this several times (3-5 passes) until the dough is smooth, pliable, and rectangular. This helps to further knead and strengthen the dough.
- Gradually Decrease Thickness: Without folding, reduce the roller thickness setting one notch at a time, feeding the dough through once or twice at each setting. Continue until you reach your desired thickness. For lasagna, settings 4-5 are common; for fettuccine or spaghetti, 6-7; and for very thin capellini, 7-8. Always dust lightly with flour between passes to prevent sticking.
Cutting Your Favorite Shapes
Once your pasta sheets are perfectly rolled, it’s time to cut them.
- Swapping to Cutter Attachments: Carefully remove the pasta roller and attach your desired cutter (spaghetti or fettuccine) to the power hub, securing it firmly.
- Feeding Sheets Through: Turn the mixer to speed ‘2’ and gently feed your pasta sheets through the cutter. The machine will do the work, producing perfectly uniform noodles.
- For the Pasta Press: If using the Gourmet Pasta Press, feed suitably firm dough into the hopper. The press will extrude the chosen shape, which you then cut to your desired length with the built-in wire cutter. Remember that dough consistency is key for optimal results with the press.
Pro Tips for Success
- Keep Dough Floured: Generously dust your dough and working surface with flour (semolina or all-purpose) to prevent sticking, especially as the sheets get thinner.
- Work in Batches: Don’t try to roll or cut too much dough at once. Keep unused dough covered to prevent it from drying out.
- Don’t Rush: Let the mixer do the work. Guiding the dough gently and steadily is more effective than pushing or pulling.
- Dry Pasta Briefly: Once cut, lay your fresh pasta on a lightly floured surface or a pasta drying rack for 15-30 minutes before cooking. This helps prevent sticking and maintains shape.
Cleaning and Maintenance: Keeping Your Attachment in Top Shape
Proper care ensures your KitchenAid pasta maker attachment remains a prized kitchen tool for years.
- The Golden Rule: Never immerse your pasta attachments in water or put them in the dishwasher. Water can damage the internal mechanisms and lead to rust.
- Allow Dough to Dry: The easiest way to clean these attachments is to let any residual dough dry completely (typically for 30-60 minutes).
- Brush Away Residue: Once dry, the dough will become brittle. Use the cleaning brush that often comes with the set, or a toothpick, to gently brush or pick away any dried flour and dough from the rollers and cutters. The sturdy stainless-steel construction makes this process straightforward.
- Storage: Store your clean, dry attachments in their original box or a designated drawer to protect them from dust and moisture.
Beyond Spaghetti: A World of Pasta Possibilities
With your KitchenAid pasta maker attachment, the culinary landscape expands dramatically. You’re no longer limited to basic shapes but can explore a wide variety of Italian classics. Imagine creating delicate ravioli filled with ricotta and spinach, rustic tortellini swimming in a rich broth, or broad, satisfying sheets for an authentic lasagna. The fettuccine and spaghetti cutters open doors to creamy Alfredo, robust marinara, or vibrant pesto sauces. With the pasta press, you can delve into the unique textures of bucatini, rigatoni, and fusilli, perfect for clinging to heartier meat sauces or chunky vegetable ragùs. Each shape offers a new opportunity to pair with complementary sauces, enhancing the overall dining experience.
Frequently Asked Questions About KitchenAid Pasta Maker Attachments
Q: Are KitchenAid pasta attachments worth the investment?
A: Absolutely! If you already own a KitchenAid stand mixer and love fresh pasta, the attachments offer unparalleled convenience, quality, and versatility, making them a worthwhile investment that elevates your home cooking.
Q: Can I make gluten-free pasta with these attachments?
A: Yes, you can! Many home cooks successfully use gluten-free pasta dough recipes with their KitchenAid pasta roller and cutter attachments. The key is to ensure the dough has the right consistency—often a bit firmer than traditional dough—to pass through the rollers and cutters without sticking or tearing.
Q: What’s the difference between the roller and the press?
A: The pasta roller creates flat sheets of dough, which you can then cut into various flat noodle shapes (like lasagna, fettuccine, spaghetti) or use for filled pastas (ravioli, tortellini). The pasta press, an extruder, forces dough through dies to create tubular or spiral shapes like bucatini, rigatoni, and macaroni.
Q: How do I clean my KitchenAid pasta attachment?
A: Never wash them with water. Allow any leftover dough to dry completely on the attachments. Once dry, use a small brush or toothpick to remove the brittle dough and flour. They are designed for dry cleaning to protect their internal mechanisms.
Q: Are there third-party KitchenAid pasta attachments?
A: Yes, several brands offer third-party pasta attachments compatible with KitchenAid stand mixers. While some can be good, KitchenAid’s own attachments are generally praised for their robust build quality and precise performance, often making them the preferred choice for consistent results.
Conclusion: Elevate Your Home Cooking with a KitchenAid Pasta Maker Attachment
The journey to making authentic, delicious homemade pasta is a rewarding one, and with a pasta maker for KitchenAid mixer, it becomes an enjoyable and accessible culinary adventure. These attachments leverage the power of your existing stand mixer, transforming it into an efficient, hands-free pasta-making station. From the smooth, consistent sheets produced by the roller to the perfectly cut noodles and unique extruded shapes, you gain the freedom to explore an entire world of fresh pasta. So, dust off your KitchenAid, embrace the joy of creating with your own hands (and its motor!), and prepare to impress your family and friends with pasta that’s truly al dente perfection. Your culinary creativity is just an attachment away!